Unleash AI Superpowers with Proxmox LXC & GPU Passthrough in Docker
Discover how to set up a Proxmox LXC container with GPU support for optimized AI and Large Language Model (LLM) development, enhancing performance and efficiency on a budget in your local environment.
Introduction
In today’s technology-driven era, developing and testing Artificial Intelligence (AI) models and Large Language Models (LLMs) locally has become a favorite pastime for developers and researchers alike. Imagine having your own personal playground where you can experiment with the latest in AI technology—like DeepSeek R1 or creating Retrieval-Augmented Generation (RAG)—all without breaking the bank! Setting up a Proxmox LXC container with GPU capabilities can supercharge your local environment, making it faster and more efficient. This guide will help you transform your hardware or old gaming rig into a supercharged setup!
Why Use Proxmox LXC Containers?
Proxmox LXC containers offer several advantages over traditional virtual machines (VMs), including lower overhead, faster boot times, and easier resource management. They also allow you to share the GPU among multiple LXC containers instead of locking it to a single VM. This makes them ideal for efficiently sharing hardware resources across different workloads.
LXC vs. Docker
LXC (Linux Containers) and Docker are both technologies used to create isolated environments, but they serve slightly different purposes and have distinct characteristics:
- LXC: Primarily used for system-level virtualization where users need fine-grained control over container configurations.
- Docker: Designed to simplify application deployment and management by providing an easy-to-use interface and extensive tooling.
Docker running inside LXC combines the best of both worlds. This setup allows you to benefit from of both lightweight isolation through LXC and robust application deployment features with Docker, including GPU acceleration.
High level steps
- Install NVIDIA Drivers on the Proxmox host
- Create New Proxmox LXC Container
- Enable GPU Passthrough to the LXC container
- Install NVIDIA Drivers Inside the LXC Container
- Install the NVIDIA Container Toolkit Inside the LXC
Prerequisites
- GPU: NVIDIA 3090 with 24GB VRAM or similar. More VRAM is better for running larger LLM models.
- Operating System: Tested with the latest Proxmox VE 8.3
I got a used NVIDIA card on Facebook Marketplace for around $600 that is great value at this time. It can run LLMs with over 32B pretty well, even on my 12 years old machine with Intel i7-5820K CPU and 64Gb DDR4 memory.
Install NVIDIA Drivers on the Proxmox host
Before creating LXC container, make sure to have the proprietary NVIDIA drivers installed and working on the Proxmox host.
-
Install kernel headers and build dependencies
- Login to your Proxmox server’s web interface and navigate to the “Shell” in the top right corner.
1
2

 apt install pve-headers pkg-config libglvnd-dev nvtop -y
 apt install dirmngr ca-certificates software-properties-common apt-transport-https dkms git -y
-
Download the latest NVIDIA drivers
- Option 1: Using Official NVIDIA drivers page
- Option 2: Using NVIDIA GitHub repo (Recommended)
1 2
cd /tmp wget http://international.download.nvidia.com/XFree86/Linux-x86_64/565.77/NVIDIA-Linux-x86_64-565.77.run -
Install NVIDIA drivers and Reboot
1
2

 chmod +x NVIDIA-Linux-x86_64-565.77.run
 ./NVIDIA-Linux-x86_64-565.77.run --no-questions --ui=none --disable-nouveau
-
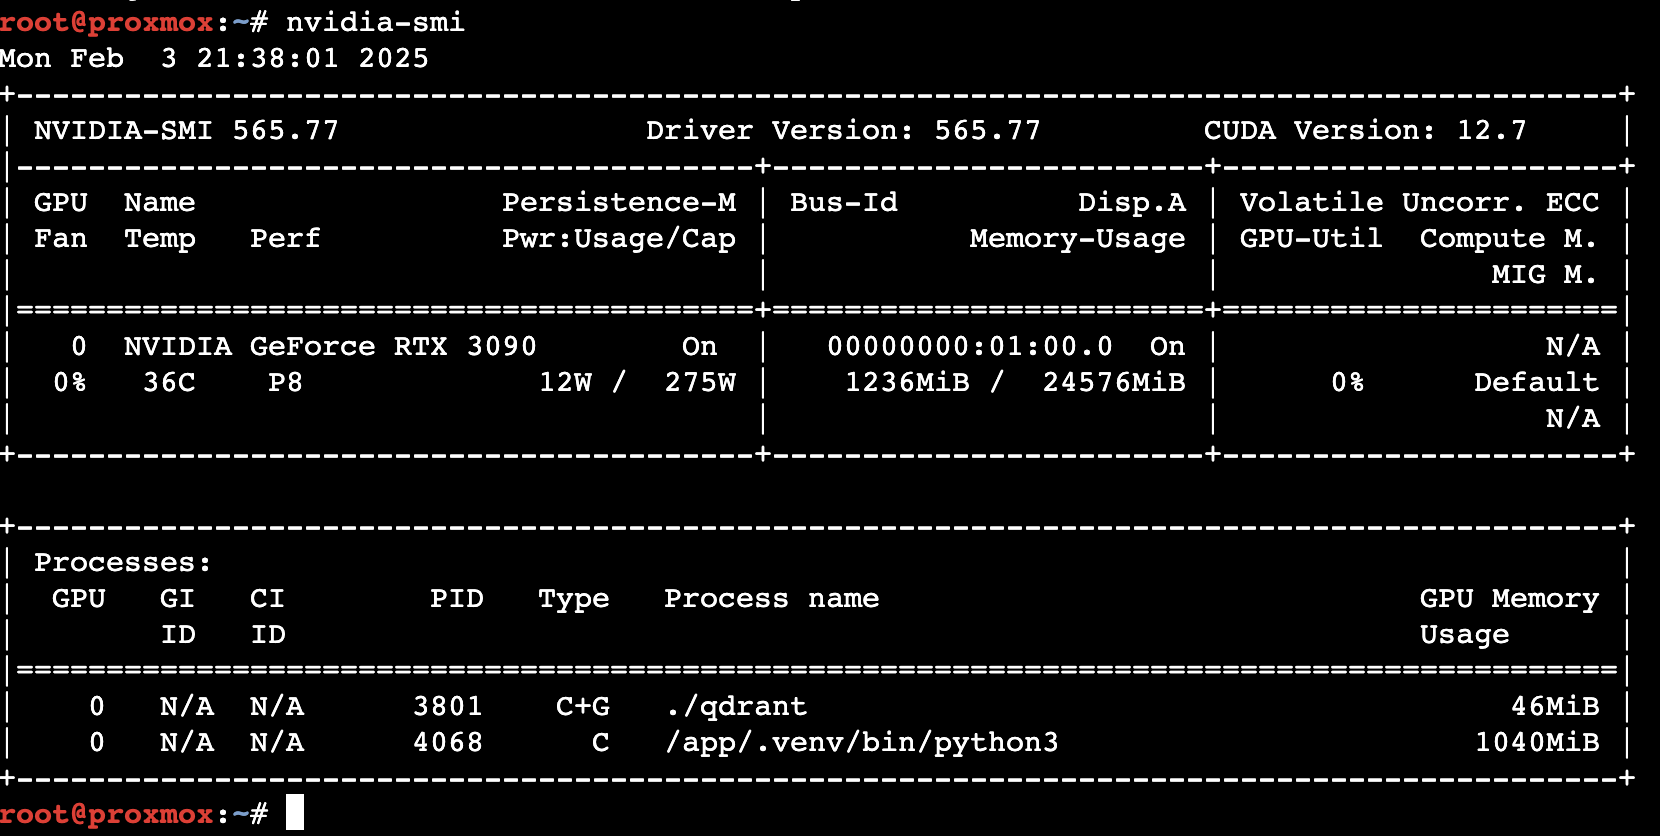
Check everything is working
- Run nvidia-smi and should see the GPU info.
1

 nvidia-smi
Create New Proxmox LXC Container
The community Proxmox VE Helper-Scripts make this step a breeze. Copy/paste the one-liner below in Proxmox shell.
-
Access the Proxmox Web Interface
- Login to your Proxmox server’s web interface and navigate to the “Shell” in the top right corner.
-
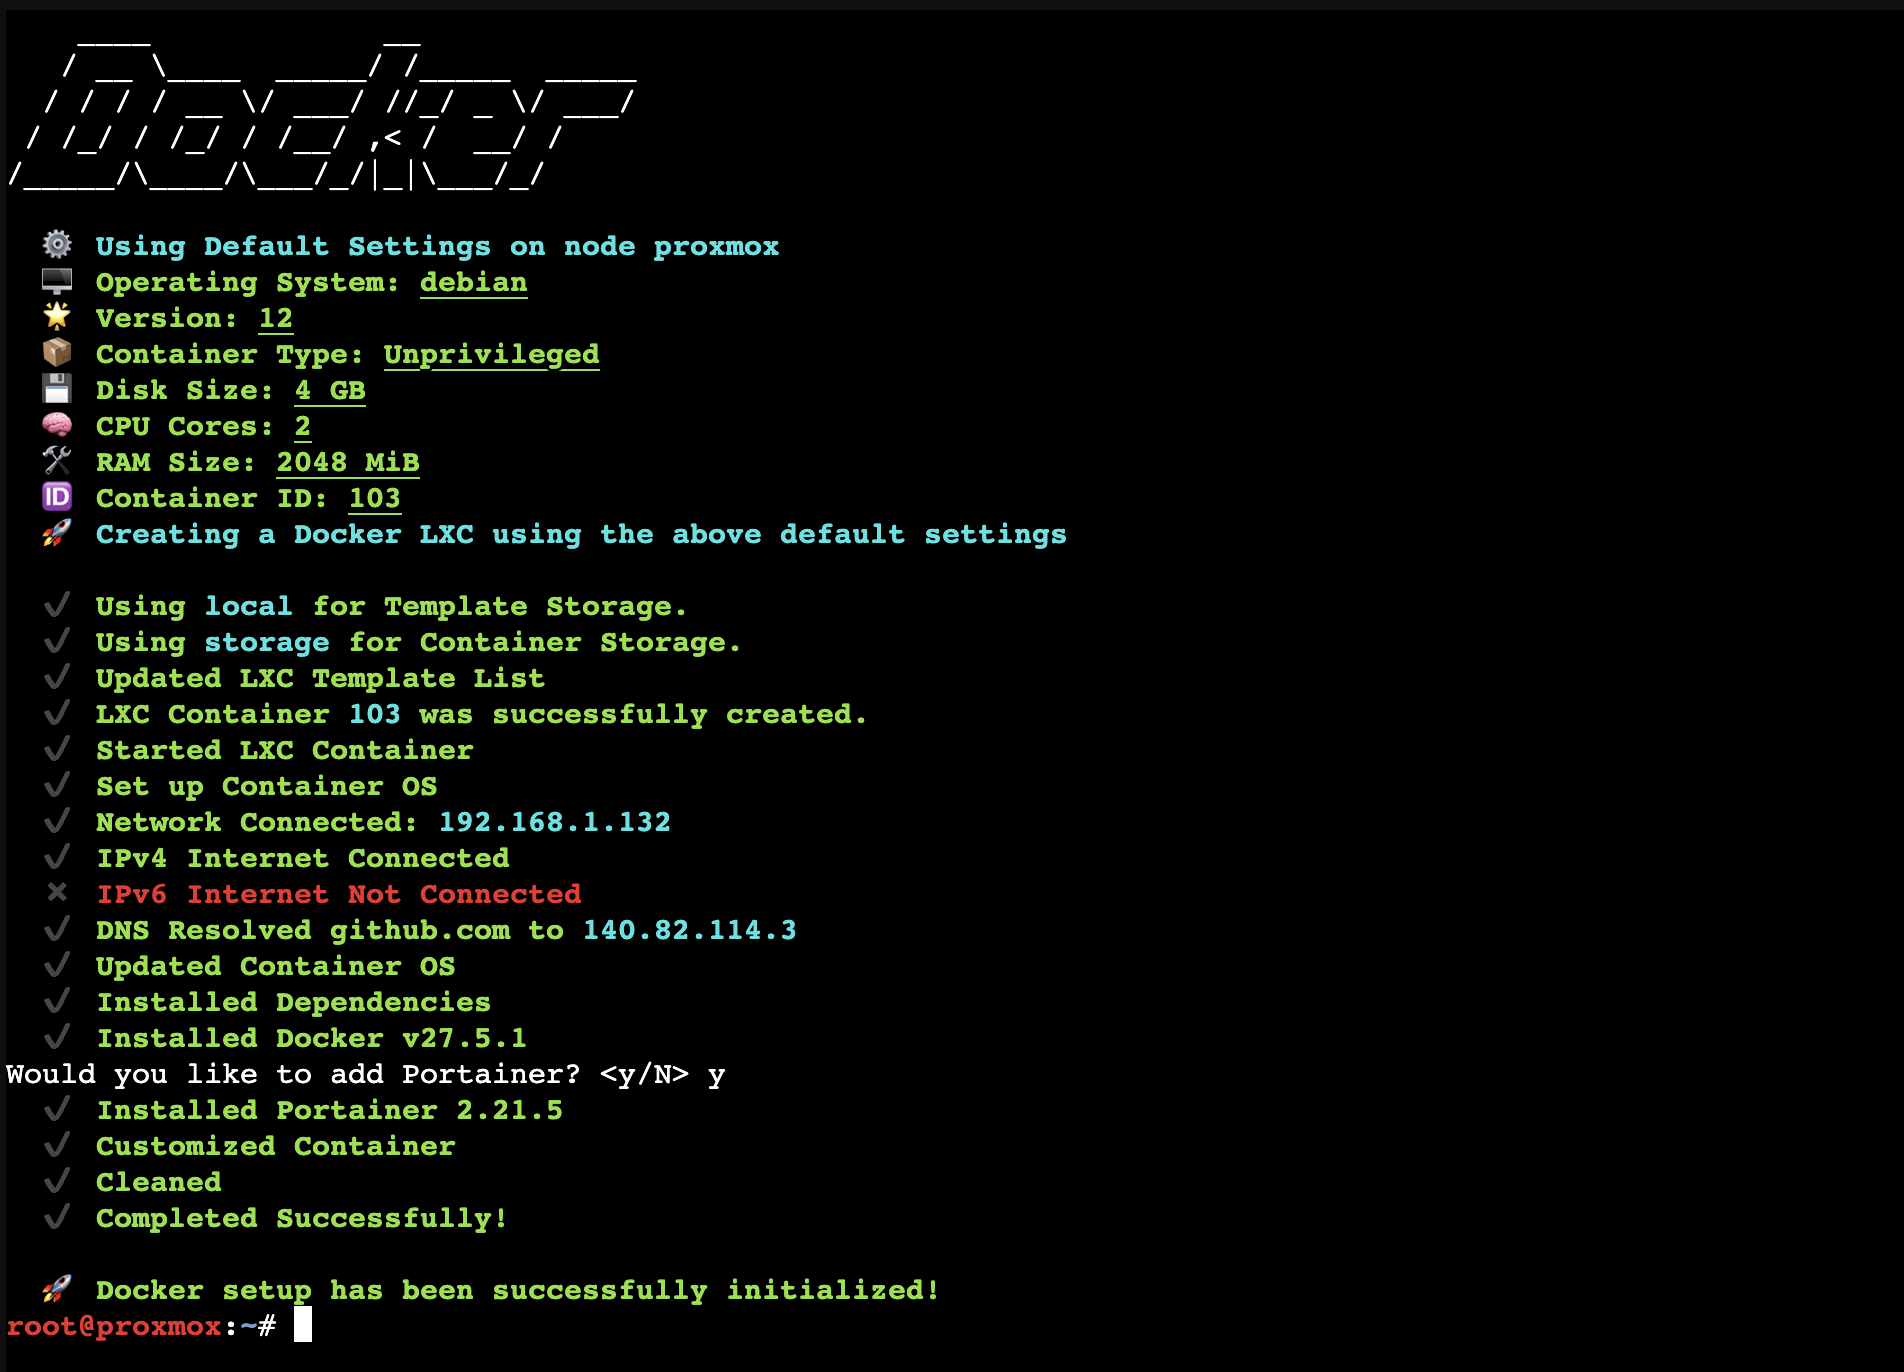
Run the LXC script
- Paste this command to start the LXC script and select the Default settings.
- Don’t forget to install Portainer at the end, if you like.
1

bash -c "$(wget -qLO - https://github.com/community-scripts/ProxmoxVE/raw/main/ct/docker.sh)"
Enable GPU Passthrough to the LXC container
-
Check the NVIDIA cgroup IDs:
Run this command:
1
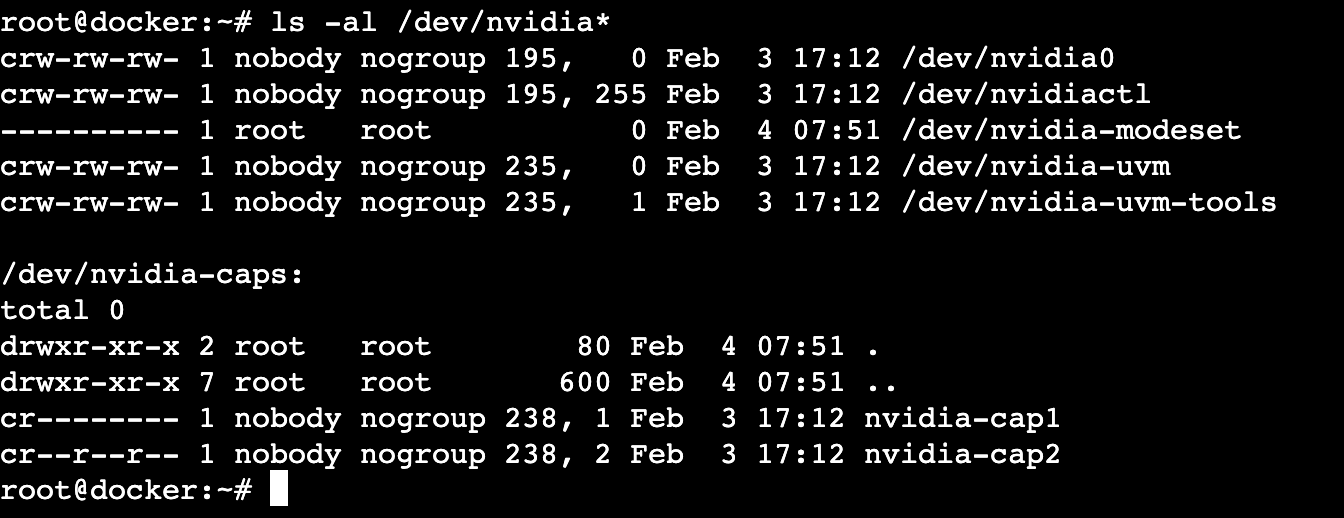
ls -al /dev/nvidia*
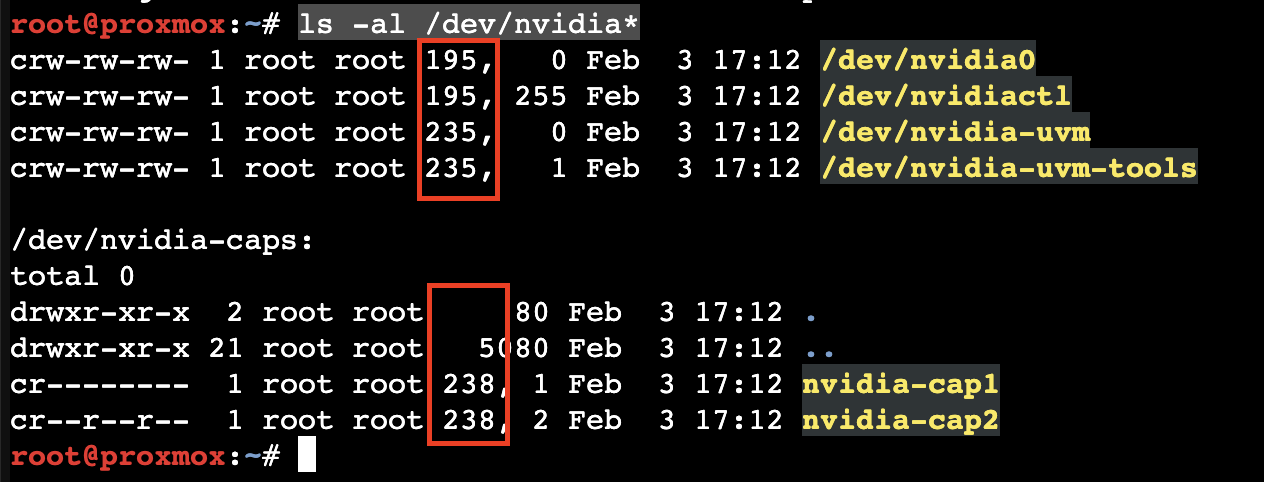
The output will be similar if you have a single GPU (nvidia0) and the universal groups for nvidiactl, nvidia-uvm, nvidia-uvm-tools, nvidia-cap1, and nvidia-cap2. Note the IDs listed in the output, such as 195, 235, and 238. For multiple GPUs, there will just be more lines. These IDs will be unique to your system, so make sure to take note of them for use in the next step.
-
Add NVIDIA group IDs to LXC config for GPU Passthrough:
- Edit the LXC config
/etc/pve/lxc/xxx.conf - Reboot your system to apply changes.
1 2
# Example nano /etc/pve/lxc/103.conf- Copy/Paste to append these lines with your group IDs and save.
1
2
3
4
5
6
7
8
9
10

 lxc.cgroup2.devices.allow: c 195:* rwm
 lxc.cgroup2.devices.allow: c 235:* rwm
 lxc.cgroup2.devices.allow: c 238:* rwm
 lxc.mount.entry: /dev/nvidia0 dev/nvidia0 none bind,optional,create=file
 lxc.mount.entry: /dev/nvidiactl dev/nvidiactl none bind,optional,create=file
 lxc.mount.entry: /dev/nvidia-modeset dev/nvidia-modeset none bind,optional,create=file
 lxc.mount.entry: /dev/nvidia-uvm dev/nvidia-uvm none bind,optional,create=file
 lxc.mount.entry: /dev/nvidia-uvm-tools dev/nvidia-uvm-tools none bind,optional,create=file
 lxc.mount.entry: /dev/nvidia-caps/nvidia-cap1 dev/nvidia-caps/nvidia-cap1 none bind,optional,create=file
 lxc.mount.entry: /dev/nvidia-caps/nvidia-cap2 dev/nvidia-caps/nvidia-cap2 none bind,optional,create=file
Restart the LXC container after saving the config file.
- Edit the LXC config
-
Verify GPU Passthrough
- Login to your Proxmox server’s web interface, select the LXC container and navigate to the “Console” in the top right corner.
- At this stage, you should see the NVIDIA groups show up inside the LXC container with the same commands we used earlier on the host side:
1

 ls -al /dev/nvidia*
Install NVIDIA Drivers Inside the LXC Container
This step is very similar to installing the drivers on the host, but the commands vary slightly.
-
Download the NVIDIA driver inside the LXC
- Login to your Proxmox server’s web interface, select the LXC container and navigate to the “Console” in the top right corner.
- Download the driver
1 2
cd /tmp wget http://international.download.nvidia.com/XFree86/Linux-x86_64/565.77/NVIDIA-Linux-x86_64-565.77.run -
Install drivers and restart the LXC
- Note we are skipping the kernel modules this time
1
2
3

 chmod +x NVIDIA-Linux-x86_64-565.77.run
 ./NVIDIA-Linux-x86_64-565.77.run --no-questions --ui=none --no-kernel-modules
 reboot
-
Check everything is working
- Run nvidia-smi and should see the GPU info.
1

 nvidia-smi
Install the NVIDIA Container Toolkit Inside the LXC
-
Add the NVIDIA repo
- Login to your Proxmox server’s web interface, select the LXC container and navigate to the “Console” in the top right corner.
1
2
3
4
5
6
7
8
9
10
11

 # Install dependency
 apt install gpg curl -y

 # Add the NVIDIA signing key
 curl -fsSL https://nvidia.github.io/libnvidia-container/gpgkey | gpg --dearmor -o /usr/share/keyrings/nvidia-container-toolkit-keyring.gpg

 # Add the NVIDIA repo to sources list
 curl -s -L https://nvidia.github.io/libnvidia-container/stable/deb/nvidia-container-toolkit.list | sed 's#deb https://#deb [signed-by=/usr/share/keyrings/nvidia-container-toolkit-keyring.gpg] https://#g' | tee /etc/apt/sources.list.d/nvidia-container-toolkit.list

 # Update cache
 apt update
-
Install nvidia-container-toolkit
1

 apt install nvidia-container-toolkit -y
-
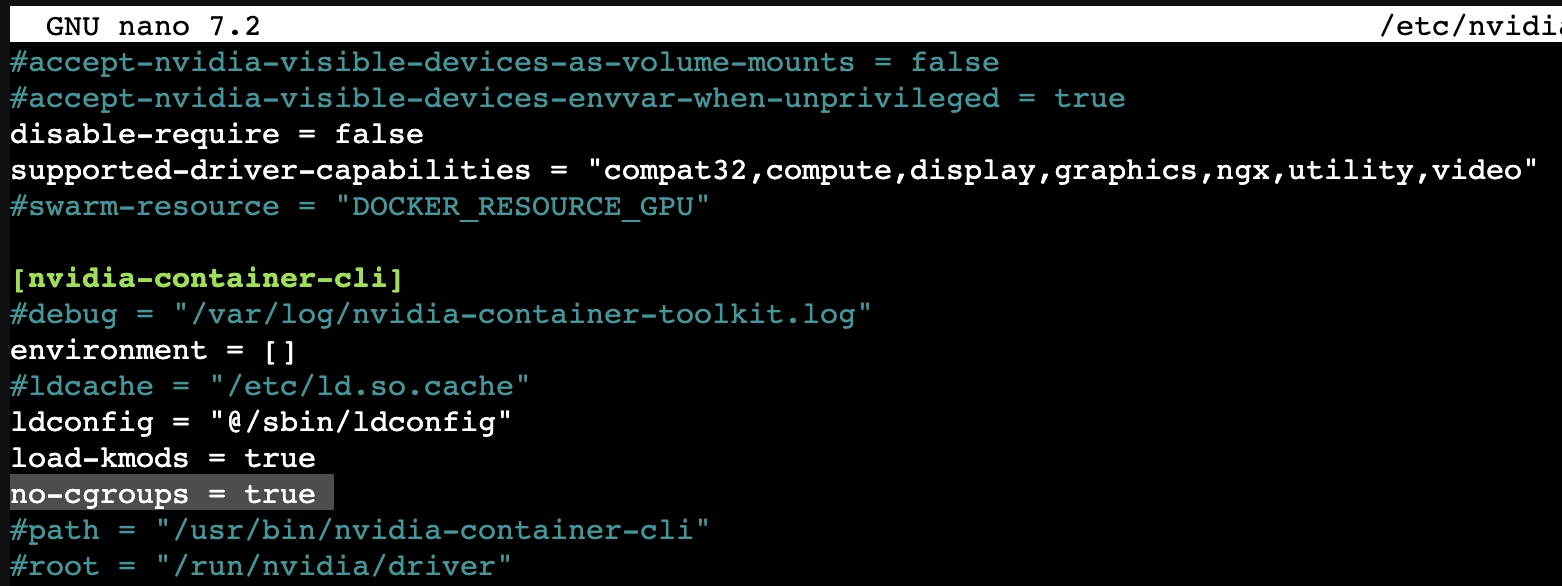
Enable cgroups
- Edit the config.toml and set the no-cgroups to true from false
- Save and restart the LXC container
1
2

 nano /etc/nvidia-container-runtime/config.toml
 reboot
-
Set up the NVIDIA Container Toolkit to work with Docker
1
2

 nvidia-ctk runtime configure --runtime=docker
 reboot
Running AI Models and LLMs
Optimizing Performance with GPUs
Once everything is set up, you can start running your AI models or LLMs within the LXC container. Utilize frameworks like TensorFlow or PyTorch that support GPU acceleration for significant speedups in training and inference tasks.
Conclusion
Setting up a Proxmox LXC container with GPU capabilities provides an efficient local development environment tailored for high-performance computing needs, especially useful for developers working on AI models and LLMs, and on a budget. By following this guide, you can maximize your hardware’s potential to accelerate your projects and research efforts.